Here is a simple tutorial how to make a diorama using Plaster powder.
Materials:
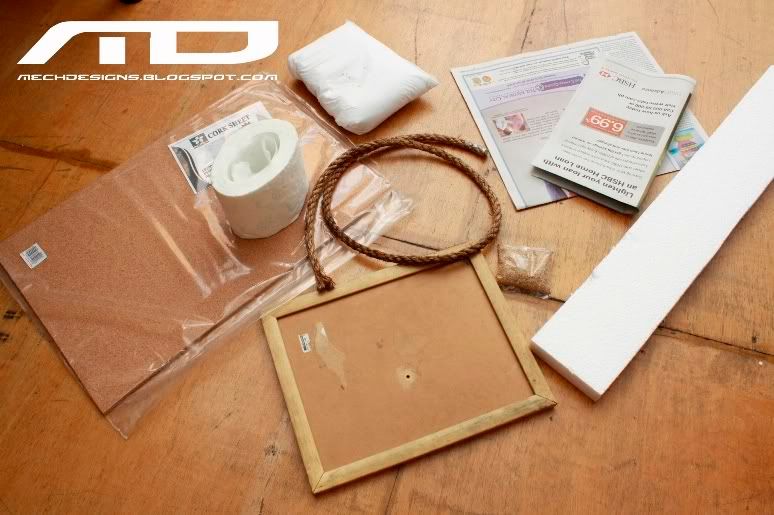
Old picture frame - (i used my deceased father in law old picture frame that was about to be thrown away.)
Rope - you can find it in fisherman's items store or probably in the hardware's
Plaster Powder
cork board sheet
small rocks
tissue
Styrofoam
Cheap Acrylic paints
Oil Pastel
Lighter fluid
masking tape
wood glue
here are some of the materials (masking tape, wood glue, Oil pastel, acrylic and lighter fluid not included in this photo)
ok first you need to put masking tape on the frame.

cut some block of styro and attach it using a glue or wood glue. The styro will serve as a rocky slope, mountain or rock pile in your diorama.

next crumple some news paper just like what you see below. This will give more mountain like structures in your diorama.


on the floor itself put a crumpled news paper on top of it. It will give a uneven ground work later.

Now that our main setup for the diorama is ready let's go on ahead and play with the plaster powder.
the things you will need are;
a container where to put your plaster powder
another container for water
tissue
water
and of course the plaster powder

ok first we need to unpack the plaster powder and put it on a container

now look at that white powder, even without touching it, it already look like an awesome groundwork.

then next is preparing your tissue's

have a couple of this tissue strips. This is the alternative if you are using the Plaster of Paris where a Gauss is used.

now that the powder is ready and we have tissue strips, let's start working on the diorama.
first put the tissue paper in the container with water for 1 second then put it in the diorama (you need to be fast in this or you will have difficulty laying out the tissue)

then using a cup get some plaster powder

put it on the wet tissue paper

you can use a wet sponge to spread it.


or using the sponge, wet the diorama using the sponge then spread the powder with finger. (Don't do this if you're eating and working at the same time. :P)


continue doing it until you cover the whole diorama. Now that it's all covered up let's wait for it to dry. (Isn't it easy?) Just wait for 30 to 1 hour to let it dry.

Now let's get the rope that we have earlier. Credits to fichtenfoo for this amazing technique.

ok first we need to reconsider the scale here is the comparison of the 1/100 figure and the rope. you can see that there are some rope strips that is too big for the figure.

so what we need to do is separate the thinner one's from the thicker one's.

now we have a much better looking grass work later. (It's still look a little out of scale if you ask me. :D)

ok now let's go back to the diorama. Here are some shots of the unpainted ground work using plaster powder.


now after waiting for the plaster to dry up, It's now as hard as rock! it's now time for PAINTING!!!
ok get yourself some cheap poster acrylic paints.
color used: red, yellow, black, mahogany(or brown will do)

mixed it all together to create the ground color just like below
mixture(5% red, 10% yellow, 5% brown, 1% black, 79% water)
Yes this mix will have more water because we will do a wash + sponge technique

Using a sponge dip it in the mixture and damp it on the diorama. Oops! don't brush it! just damp it and let the mixture flow on the diorama, just doing it you can now already see the details of your ground work

continue doing it until you cover all the areas.


Now using the rock/ground we can mix it with the paint we have and add it to our diorama.


here it is after adding some rock's/ground to our diorama.

now let's wait for about 30 minutes to 1 hour to let the first paint coat to dry.
ok once it's dry we will do another wash. using 10% black and 90% water mixture.


using the sponge + wash technique we did earlier, apply it again but this time using the black wash mixture we have.

then wait for another 30 minutes to 1 hour to let it dry.
Now after waiting let's get that oil pastel and create a pastel mixture

here i used the golden pastel. (hmm sounds fancy)

using the hobby knife i grated the oil pastel and thinning it with a lighter fluid.


now using a brush i applied it on our diorama. Once it all dry up we will have nice dry looking ground work.

And in case you are wondering where did i use the cork sheet. Well i used it in the bottom of the frame because as you can see below the back board of a picture frame is all wet-up because it's only maid of paper-like material.


so just let your diorama dry up and we're all done! Now isn't it easy?
next update will be the finished model. Till the next update guys!
That is a nice tutorial, bro. Good! :)
ReplyDeleteOutstanding tutorial mate! Thank you!
ReplyDeletewow i wanna try this one...About th plaster powder how much is it?
ReplyDeleteDarkWorkx - it's relatively cheap about 20% price of the plaster of paris, im not sure where you are so currency and price in your country might be different.
ReplyDeleteSuperb!
ReplyDelete